Sunday, March 30, 2008

Why we 'keep it green'


Here's why we spend our time and energy trying to reduce the negative impacts our consumer habits are having on the earth: we kind of like it the way it is.
Jessi, TJ, Lulu, Buster and I posing for this photo opportunity in 15 mph wind that seemed to carry small daggers of ice. I actually had shorts on when I was getting ready to leave the house...

It's just another day at the beach for TJ and Lulu. Buster doesn't seem to mind rolling in the snow instead of sand.
This is the beach at Tettegouche state park in Minnesota.

This is the view from one of the higher lookouts. The large mound in the distance is Palisade Head. This rock formation is very popular amongst repelers. The first time we saw them dangling over the edge of the cliff, I thought it was a rescue attempt. I couldn't imagine anyone hanging over the edge on purpose!


This is the northern view from the Shovel Point lookout platform in the park. It was super windy the day we were there, but the waves were just getting going.

Tuesday, March 25, 2008

Blank Slate

Here's our house as we wait for the snow to melt and for the flowers to bloom. We have several perennials well established around the house and I added a small bed around the crabapple tree on the right last year, which required the transplanting of the tulip bulbs that were there when we moved in. It will be interesting to see if I killed all of them or just most of them.
All along the alley here are lilies and bleeding hearts, which add excellent color to the west side of the house. I may add a bed around the other crabapple sometime this summer. We've also discussed adding planters on the short walls next to the front steps. They would get awesome southern exposure and would make interesting herb gardens for our delicious dinners.

Monday, March 24, 2008

Hot tub snorkel

This is probably not what you expected. Our bathtub has a whirlpool component that uses forced air to power the jets.
This is the small attic crawl space on the north end of the house that shares a wall with the shower in our bathroom. Prior to this energy saving overhaul, the only things stored in here were scraps of drywall and various junk from the remodeling of the bathroom, plus two large bales of cellulose insulation left over from when the attic was done.
After carefully cleaning all of that out, I stapled Reflectix insulation to the studs. Before this the open studs left the plaster and lath backing to the shower clearly visible.
Then I covered the floor with a jigsaw of scraps of foil backed foam that were on the damaged pile at the building store.
The small cylinder is the air pump for the bathtub. I knew I was going to spread the cellulose insulation on top of the foil board, so I had to protect the air intake from sucking in tons of cellulose fiber and burning up.

This snorkel is about $3 worth of PVC with a small circle of screen door screen over the tip.
PVC isn't that great for the environment, and I hesitated to use it. In the end, I chose to work with what's here and eliminate waste where I could. While not the best environmental material to use, the alternatives would have likely generated far more waste than simply adding to the PVC system that is already in place.

Here's a couple pictures of the finished product. Since the floor of this attic space is the other side of the ceiling in our kitchen, it was important to me to block as much of the heat transfer here as I could. I piled the cellulose deep and sealed the little access door with some weather stripping.


I may have imagined it, but I believe that the bathroom and the kitchen were both warmer this past winter as a result.

"New" Kitchen

This post relates to the 'green' aspect of the blog, in that we are attempting to re-use or re-purpose items to better outfit our kitchen instead of buying new things. When we moved in our kitchen was designed for Hobbits decades before the concept of ergonomics was invented. The counter tops were about 32 inches above the floor, which is not compatible with my 6 foot frame. Washing dishes was a ridiculous exercise in lower back pain. In addition, the upper cabinets were fairly deep and built from the ceiling down to about a foot above the counter top. Needless to say, we removed them. Then the fun of home remodeling truly became ours. We now had an open, roomy kitchen with a destroyed ceiling (previously covered by the atrocious suspended ceiling) and no storage space at all. I won't even get into the nightmare of removing the chimney.
We operated that way for about two years, adding open shelves and re-arranging the furniture occasionally. We remained on the lookout for cabinets at antique shops and yardsales, hoping for something to fit in our small space. We even considered building something along the wall where the stove is, but that always seemed too far out of reach.
Well, this weekend we were out enjoying the Spring like weather and we re-found the almond colored metal cabinet featured in the following picture at a local antique shop. We saw it last year in our travels and thought it was nice, but over priced, so we kept looking. This time it was marked way down to a reasonable price for our budget, so we brought it home.
In order to install it, we needed to radically reorganize the kitchen. The fridge was where the cabinet is now, and where the fridge is now there were three shelves and and the small white cabinet and drawer set up now located between the stove and the new cabinet. In addition to removing the shelves, I was able to use my awesome saws-all tool to cut away a few inches from the edge of the counter next to the sink. The vertical shelves near the window had been over the stove.
Now we are able to store more of our kitchen items behind doors or under glass, which will help to dramatically reduce the collection of dust and animal hair, which is frankly gross when getting ready to cook dinner. Hopefully I won't have to rewash everything now, which will save water.
This cabinet is in very good shape for it's age and it seems to fit in nicely with the look of our kitchen, which is pretty eclectic.

That big blank spot above the stove will be filled with the salvaged cabinets we received from our neighbor, Harold. He's addicted to Freecycle and regularly brings home things that he's not sure what to do with them. We often benefit from his scavenging.

Notice the small cutting board on the white cabinet. That was one of my first RRR projects. The wood had previously been part of furniture that my employer was discarding. I was able to make this sturdy cutting surface from some of the chair frames. The very first project was the cutting board I made from the maple blanks that had once been in a bowling lane at an old alley in town that was torn down.
Things that are made by hand, whether from salvaged material or not, just have a better story than things that are mass produced.

Light Rack

Here is the awesome light rack I created by adding fluorescent lights to the metal shelving unit I had in the garage. It's pretty good for what it is, but I intend to expand the seeding capacity by building a larger, wooden shelving unit that will hold several greenhouses per shelf. They make four foot grow lights, so I'll likely make my next set up with those.

This one is nice because it's small and sturdy. It is totally portable and could be moved to our front porch or a different part of the basement if we needed to rearrange anything.

And, yes, that is the edge of the box to the Chuck Norris endorsed Total Gym 1100. In the words of an American Icon, "Six to eight minutes on the Total Gym provides an incredible workout."

This shelf is the one with the outlet box. The grow tray on this is heated, so the heating element can easily plug into the outlet. I may attach an additional light bar to the rafters above the light rack at some point, and then I could simply plug that light into the outlet. The whole rack is powered by a switch on the middle shelf, so even the outlet is turned off when the power switch is off.
You can just see the switch in the corner of the picture. I use the spray bottle to regulate the amount of water I put on each plant. I believe I over watered the first plantings, as mold grew on them. So far, with the different growth medium and less water involved, the new plantings are remaining mold free. I also think sterilizing the containers first had a big hand in the better health of the new seedlings.

This is the bottom rack, where I've planted the beans, melons, and squash. The top rack has peppers on the heating element, the middle rack is entirely tomatoes (6 different varieties). Shortly I'll be building a portable greenhouse for the front porch out of scrap lumber and a clear vinyl shower curtain. Stay tuned!

Saturday, March 22, 2008

More Past Projects

Here is the Earth Box we purchased last summer. It's designed to allow a person to garden without having a garden. The container has a false bottom that holds water without drowning the roots. The uprights are made of aluminum and are designed to support the plants as they get taller.
If you look closely at the bottom of the picture you'll see the spray bottle. That holds a noxious mixture of onions, garlic and hot red peppers blended and strained so it can be sprayed. It is supposed to keep away insects, and I imagine it does, but it is also pretty much home made pepper spray, so if you use it, watch which way the wind is blowing.
We planted two Hungarian Heart tomatoes and two supposedly orange bell pepper plants in this one last time. We will most likely not put more than two plants total in this time. Also, the Hungarian Heart tomatoes were interesting in that they are huge (approximately 2 pounds per fruit) but that's the end of their list of positive attributes, in my opinion. They never darkened to a deep red, staying faded looking, and their flesh wasn't that flavorful, either. One problem we encountered with this system is that the plants were super thirsty and we didn't keep the water reservoir filled consistently enough, which resulted in some Root Rot. Root Rot happens in container gardening when the plant dries out too much between waterings. Enough of these dry-wet cycles, and little black rotten spots show up on the bottoms of the tomatoes.
While this is a cool apparatus for use in our gardening system, it's not cheap. Out of the box this unit was around $100 (including the $30 add on for the uprights.) We thought there had to be a better way.
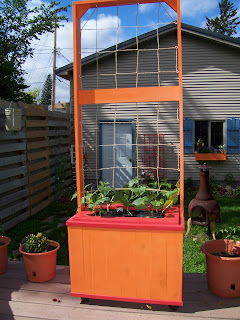
And by better, we mean more colorful and made from salvaged or scrap materials if possible. So here is our rendition of the Earth Box. It's built around a standard ten gallon tote. I built the false bottom out of small strips of wood and covered it with a left over piece of screen from when I repaired the screen door to the deck. I used super dog proof screen on the door, so that's what's in the box, but I imagine any screen would do. I used this same screen material to cover all the air holes on the rain barrels to prevent mosquito breeding.
Once we had the inner dimensions based on the tote, I built the wooden frame out of the same lumber I used on the shutters. I screwed eyelets into the sides of the uprights and wove the jute twine through them to make the mesh for the plants to grow up. All told, I believe this unit cost no more than $30 dollars and I plan to build a few more for this growing season.
It has casters on the bottom, so it can be easily rolled around the deck whenever it needs to be moved.
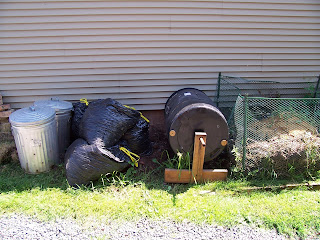
Here is my first attempt at making a homemade composting tumbler. I used one of the barrels from the car was and mounted it on this simple frame. I painted it black to help it absorb heat. It has a large flap style door on one side for adding and removing material and I drilled several holes in the sides for air and water to get in and out.
It was a total flop.
Here's why:
1. It's nearly impossible to turn once the organic matter settles to the bottom.
2. There are no baffles inside to assist in mixing the material.
3. I built it in a hurry, so the frame is crooked.
4. It sits on the west side of the garage near the alley, which gets the least amount of sunlight on our property, so the barrel is rarely heated properly.
I'll be tearing this apart and redesigning it this spring. Stay tuned for the new and improved compost tumbler.

Here's another home made rendition of an expensive store bought unit. We modeled this after the Topsy-Turvy, which is a planter made of plastic tarp material and allows you to grow tomatoes upside down. We used the TT for two seasons and it rotted part way through the second one, prompting an emergency replant of a large, inverted tomato plant in mid-July.
That was frustrating, since the TT was $20. I believe we ate four tomatoes from it the first season, so I don't think $5 per tomato is a sustainable growing practice.
We built this model from a pickle bucket and were pleased with the results. In a later post I'll show you the tomato wall, where we have 8 hanging planters growing all sorts of interesting veggies.
For this season, we're most likely to focus on tomatoes in the hanging baskets and peppers in the ground.
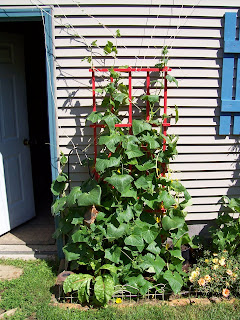


Here's a close up of our cucumber and bean trellis in mid-June last year. We have such a small yard that we try to grow as many things vertically as will grow that way. All vine based plants are trained up trellises at our house.

Seedling Status Report

I've planted several seeds in the mini green houses and placed them under the lights in the light rack. Now, it's a waiting game. I became alarmed initially when I noticed some type of fuzz growing on the tops of the little yogurt containers I used as seed pots, so I'm experimenting with different preparations for seeding to see which works best. I think the mold or moss or whatever it is is probably due to too much water/humidity and not sterilizing the containers prior to planting. For the second batch, I purchased a less organic potting soil, but more importantly I rewashed all the containers and rinsed them in a mild bleach solution. I still have the originals under lights, but I'm planting additional starters in separate mini green houses to see if that limits or eliminates the growth of the fuzz. If the starters with fuzz don't germinate soon, I'll dump them, wash and sterilize the containers they're in, and start them over.