Tuesday, April 7, 2009

Grow Lights, heavy on the 'grow'

Here's an up close shot of the lower light array. This is the bottom shelf and the lights were previously mounted individually on each of the upper shelves. This year, to increase the amount of light available to the plants, I consolidated the old lights and mounted a double bulb fixture on the two upper shelves.
These three single bulb fixtures use 18 inch bulbs, so the light available doesn't extend all the way to the ends of the shelf, but I think the denseness of the light bank compensates. Or so I'd like to think...


Here's a close-up of the lights illuminating the newest seedlings- Lulu's San Morizanos. They are doing well and are getting ready for their first transplanting.
Here's a better view of the little guys hugging the lights. They really want to be in some deeper soil. I was worried that I had doomed them a short life as spindly wisps because I sowed them directly into the seed cells that came with the green house kit, but they seem to be holding their own, so far.


These guys are just about bursting off the shelves. They are the Stupice variety and I'm exited to get them to produce this year. Last year's crop was annihilated by the Arctic Blast that nailed them the afternoon I began hardening them off, so I'll be handling things a bit differently next year.
Here's the whole thing. I propped up the seeding trays so they are much closer to the lights. So far, so good...

Sunday, March 8, 2009

Seedling update

Last summer I was astounded to learn that the foot-tall potted tomato plants at the local green house (the ones that shouted "Feed me, Seymour!" when I walked by) had actually been planted nearly a month after the spindly, quaking, awkward tomato specimens in my basement. I assumed they were using some kind of super secret green house steroids, and that may still be the case, but more importantly I learned that proximity to the light is essential in regulating the rate at which the seedlings gain height.
So this year, I'm following the directions that sage oracle at the green house laid out for me. First, throw the seeds loosely into the growing medium and cover them lightly. Heat the trays from below. When they sprout, get them up into the light. After they show true leaves, transplant them up to their necks and keep them right in the lights.
Supposedly this will yield a super hearty tomato specimen ready to withstand the rigors of late spring (also known as July).
Here are the Stupice variety I planted. They are doing amazingly well. Their seed leaves are enormous and the true leaves are ready to come in. They are supposed to yield a large number of fruit about the size of a baseball that are good for all typical tomato uses, from canning to sauce to slice and eat.
These are the Wisconsin 55 variety I've planted. They are struggling to shed the seed pods and as a result, their seed leaves are a bit jagged and rough looking. Hopefully they rally soon. Both are heirloom seeds from SeedSavers Exchange and I've had mixed results with them previously. Most of my problems resulted from having growing the plants too tall and not hardening them off properly before planting them, so I'm hoping this year will be different.
I'm in the process of re-wiring the light rack they are growing in. I'm adding more bulbs, which I hope will further assist the plants in growing thick instead of tall. Stay tuned...

Splash of Color

In the wintertime everything seems to lose its color. We get a little tire of seeing the same white landscape, and there's not much we can do about what's outside. So instead we like to put up fun colors around the inside of the house.
This is a close up of the fabric we used to make new curtains for the kitchen. Lulu found a fabric designer she likes on the interweb and we've ordered a variety of interesting stuff from them.

Here's a little less of a close up. Some of the silvery parts are threaded with shiny metallic thread. This is just a simple one-piece curtain hanging on a spring-tension curtain rod, so we can move it around and take it down with no hassle. In the summer, the cats like to hang out in the open window, so we like to be able to move the curtain however we need.
So you end up with this. Our kitchen window looks out over the alley, and occasionally there will be folks walking by (more often when it's not minus 20 degrees...) and it's a little weird to be making diner and have someone walking their dog five feet away, looking at you. Maybe I'm too conditioned to the space you get living out in the sticks, but for me, the curtain is the way to go. It lets in some light, it's bright enough to liven things up, and I can make my morning coffee in my PJ's and not have to be accused of flashing anyone.

Fall Project

Here's a project we worked on and finished while waiting for the produce to ripen in the garden last Fall.
Lulu and I like to refinish furniture. Occasionally we find items that are well built or worth salvaging and we fix them up. This is a sideboard we found at the Goodwill for like 4 dollars. Notice the crooked drawers. The slides were so worn that the drawers hung like loose teeth.
I was able to save the awesome funkadelic orange and lime green patterned, fake velvet fuzz accented, 70's era contact paper drawer liner in its original splendor. Sadly, I was unable to find a roll of matching contact paper to line the other drawer.

The top looked like wood grain Formica, but turned out to be simulated wood grain contact paper, on top of bright orange contact paper, on top of heavily scratched wood grain Formica. It was a regular archaeological dig to get down to bare wood. Apparently contact paper played a prominent role in the decorating style of its previous owners.

This flashy pink sideboard is the refurbished and rejuvenated version of the crumbling Goodwill purchase. As you can see from the original pictures, it was falling apart. Now, it's one of the most unique items of furniture in our house. The top surface is treated with a type of paint that turns it into a chalk board.
Incidentally, that candelabra was initially black wrought iron. It's interesting what a little Robin's Egg Blue spray paint can do for you...

Tuesday, February 10, 2009

Snow Day!

I think I'll work on my basement nursery and get it ready for planting seeds. This year I intend to focus on starting only those items that need the extra growing time for our climate, such as tomatoes and peppers and a few squash. I'll direct sow the rest of the crops like beans and peas. I've read my Mother Earth News diligently over the winter and have learned several new tricks for maximizing our garden's productivity and enhancing biodiversity and microclimates (that last part is just for you, Lulu!) Stay tuned!

Winter Update

Here I am getting ready for my morning commute. I work 1.4 miles from home now and typically venture to work under people power. Now that it's deep into winter, I have to bundle up. I've modified my winter garb until I had the studly ensemble you see here.
The back pack is ideal for transporting my stuff, but some times it doesn't all fit, as is the case here where the monster size bag of Honey Nut Scooters protrudes from my pack, making it an official protuberance.
Layers, snow pants, and my headphones get me to and from work everyday.


By contrast, here I am on the first day of school, decked out in full dork regalia. Yes, I do roll the right leg of my pants to keep it out of the chain.
Since this picture, I've added fenders to keep the mud off my goggles and upgraded the seat. This bike is approaching ten years old and hasn't aged well. I hope to find a more suitable used bike before school starts again in the fall. I've considered getting actual saddle bags that are designed for bikes, but I really like the Publix milk crate, so we'll have to see what transpires.

Tuesday, October 14, 2008

The Harvest

A few weeks back we had several days of heavy rain with the first hard frost forecast for the season, so we went up to the garden to see what was to see. These are pictures of our two plots in mid harvest. We found that many of the tomatoes had begun to ripen and a mild frost at some point had weakened the plants enough that some of the fruit was falling off.


We collected 83 pounds of produce that day, mostly in tomatoes, and made our first batch of awesome tomato goodness. We went back up to the garden before the big frost was expected and harvested every green tomato we could get. These we divided up with TJ and we loaded our bounty onto a 4x8 sheet of hard board in the garage to ripen. We also put up a small table on the front porch and loaded it with plenty of green fruit.

Here's a peek at some of the cool stuff we grew. You'll see lots of tomatoes, but there are two kinds of squash shown here and a reddish husked breed of sweet corn that turned out surprisingly well. Slugs, centipedes and mammalian garden varmints got into our potatoes pretty bad this year, so our crop left a bit to be desired. We ate several batches of beets but lost the last one to the voles.

Monday, September 15, 2008

How to Eat Out of a Brain Bowl...

First we wanted fresh, firm tomatoes. These ones were collected from our garden and from the Farmer's Market in Duluth. We have them ripening here in the south facing windows of our three season porch.

Next, we prepare the tomatoes. After you quarter them, you roast them for about 40 minutes at 350 degrees. We drizzled some good olive oil over them and sprinkled some sea-salt and fresh cracked pepper, plus added some fresh, minced garlic before they went into the oven.
Here we are using our Foley Food Mill, a device that separates most of the seeds and the skins from the flesh of the tomatoes. We purchased ours at a second hand store and I had to bang out a dent in before it would work properly, but once we got going it worked like a dream. I think I prefer this approach over the large conical sieve and wooden paddle model. This one is compact and worked very well.
Here we added fresh chopped basil and rosemary to the velvety tomato goodness that our food mill created. We had both herbs growing in the back yard, so this batch of soup has some extremely fresh ingredients!
We cooked the soup for a bit to mix the flavors, then fried up some cheese sandwiches, poured the delicious tomato nectar into our brain bowls and, voila! Aub found the brain ware on Etsy, an on-line artist's studio. These were hand crafted and shipped to us for just this kind of culinary excitement. We also have matching brain mugs, so we may need to experiment with some Bloody Mary mixes for those...

It's the Great Pumpkin, Charlie Brown!

Get a load of this. I had to stand all the way across the alley, almost had to climb the neighbor's fence, to get this monstrosity in the frame. This started as a few sprouts that volunteered in the compost pile. The next thing I know, they're taking over the fence, the garage, half the alley... Cars have to drive around this behemoth!

Here's a close up of two different gourds growing together. On the left is a pumpkin (90% sure on that- it could still be a spaghetti squash), on the right is an immature acorn squash. In the front/middle of the frame is one of the fronds that are close to the size of trash can lids.

This is a Hubbard volunteer, I believe. I don't recall the longitudinal stripes, but my memory isn't specific on these. In any case, this thing is about the size of a foot ball.

This is a photo for perspective. That little white spot at the bottom is my size 12 shoe. These fronds are almost knee high and could possibly serve as an alternative roofing material in a pinch.

Here's the other side of the fence with the clematis on it. The pumpkin hanging there is larger than some of the water melons we bought this summer. Notice the tiny one in the upper right hand corner. I'm sure that will get pollinated (the bees were scarce earlier in the season but have been making up for lost time just lately) and then perhaps my fence will collapse. Rest assured that I will post pictures of that if it happens!

Sunday, September 14, 2008

More Bounty of the Harvest

A huge batch of pickles waiting to be pickled. On the side are beets and a few carrots. Stay tuned for the pictures of them after pickling.

Here's a better look at the whole variety of our recent harvest. We have some beans, lots of tomatoes, several egg plant, one large Hubbard squash, more beets and a nice selection of glads.
The artful way they are displayed is according to the careful eye of my lovely wife.


We planted our onions under a layer of black plastic, like much of the garden. By far, the onions fared the best. We pulled a few along the way, but here's the whole rest of our crop, drying away in the garage. In a few weeks we'll braid the dried greens and hopefully have a cool way to store/display our harvest into the winter.

Container Gardening!

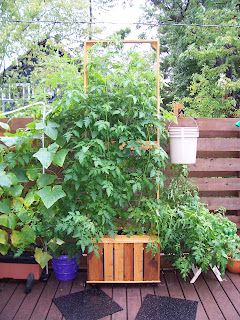
Here are some early Fall pictures of our tomatoes as they ripen in our various containers. This first shot shows all four varieties of container we used this season. On the left, our original, store bought EarthBox, which produced a decent crop of pickles, many of which are canned and in the pantry.
Next is a plain old pot, painted purple, with our sole surviving specimen of the Wisconsin 55 tomato. It's done quite well nestled in between the cukes and the Red Figs.
Next in line is the new GrowBox 2.0, which boasts a whopping 8 foot growing frame. The tips of the tallest plants are just reaching this amazing height as the days get shorter and the nights grow cooler. Hidden under all this foliage the Red Fig tomatoes are abundant.
And lastly, hanging to the right is one of six hand made upside down growing containers that are laden with green fruit. All six hangers have the same variety of tomato called Mucovite. I don't know much about this type, except that it is an heirloom breed and seems to like hanging upside down.
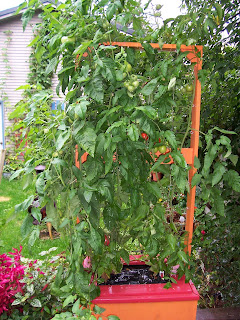
GrowBox 1.0 in all its glory. This has two varieties of plant going strong. On the left, one of our two Brandywine plants is loaded with large, interestingly shaped fruit. On the right is an Early Girl that produced a few fruit right away and has been slightly disappointing as the season wore on.
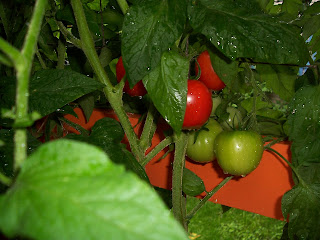


Here's a close up of the third, fourth and fifth ripe fruit the plant has produced. We've struggled with keeping our plants fed with the proper minerals and nutrients, so for the past several weeks, many of the fruit that were ripening on these plants were rotting from the blossom end. These were inedible and very frustrating. After consulting several organic gardening books, the best guess I can make is that the plants were low on calcium or manganese, which is a common problem for container tomatoes. After adding the powdered shells of several eggs (in a mortar and pestle), the plants seemed to stop producing rotting fruit. I added some specialized fertilizer that is made for container tomatoes, too, just for good measure and the result is pictured here.

Here's a good view of the next four hangers. Keep in mind that those are five gallon buckets hanging there and that the top board of the fence is a good 8 feet off the ground.
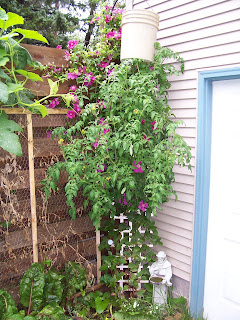

Here's the sixth and final hanging tomato of this season. It grew down into the clematis I was certain I'd killed over the winter. Notice the rogue squash or pumpkin that has grown over the fence and is threatening to take over the yard. The peas are done for this year. At the bottom there are several Swish Chard plants that are standing tall next to the Black Eyed Peas, which are really beans and I really don't know what to do with yet.

Thursday, August 21, 2008

Volunteer Army

This is a cherry tomato growing in the geranium flower box on the garage window. It's a hearty little thing with several small tomatoes getting ready to go.
This is the volunteer ground cherry that is attempting to take over our flower and vegetable bed in front of the garage. We grew a ground cherry last year and didn't use any of the fruits, mostly because we weren't sure what to do with them. This one popped up on it's own this year and I plan to attempt to make some jam with the fruit.

Hollyhocks

The hollyhocks finally bloomed. They turned out to be a bit short on variety, but they were loaded with flowers. I'll need to start some other seeds this winter to hopefully get more colors going. Someday, we may have a crop of these things that cover the whole side of the house.

Here's a close up of the red ones.

Feed Me, Seymour!

Here are some update photos of the rogue squash growing in my compost pile. Somewhere under all that vegetation is a small pile of organic matter that should be breaking down and getting ready to provide nutrients to my plants next year.

Instead, it's providing all the nourishment that this seemingly steroid supported squash plant is consuming right now. I have no idea about what condition the compost will be in, but I do know that there are tons of blossoms on this thing. Since this photo was taken, the runners have infiltrated the alley en masse and the small receptacle for dog waste is completely obscured beneath squash fronds that could double as hang-gliders. Wow.

Bountiful Harvest?

I won't exactly be giving Bayfield a run for its money come next blueberry season, but I did manage to produce three (3) delicious berries this year. Not bad for two whole bushes...

Tuesday, August 19, 2008

Bag Man

I enjoy making reusable grocery bags. Our current technology is stuck in a lose-lose argument on the answer to the age old question, 'paper or plastic?' Creating new plastic bags is amazingly poisonous to the environment, toxifying hundreds of gallons of water every day, per bag making factory, to make a product that is so difficult to recycle that most centers won't accept them. (Some stores have started a re-use campaign, or provide receptacles to drop off you used bags, which is better than just throwing them in the lake). Paper bags lose much of their strength when they increase the recycled fiber content, so many bags are made with first run wood fibers, meaning new trees were used to make the bags.
Many stores are now selling durable, reusable bags in a variety of designs, which is a great step toward limiting our consumption of paper and plastic, and I applaud anyone who uses them instead of disposable bags.
My clever wife discovered a design for home made grocery bags online and we've been working with this design for several months. Shown here in the picture are several variations on the original design.
I'm getting better at remembering to bring reusable bags with me when we go to the store, and if I forget them, I'm likely to try and carry everything to the car in my arms rather than use a disposable bag, much to the chagrin of my wife.

New Project

In our small house, room for storage is hard to come by. One way we've attempted to combat this is by reducing the amount of junk we own, and that has helped prevent clutter pretty well. Another way is to keep our eyes peeled for better storage systems or other more efficient household items, and one of the best places we've found for this is the Goodwill, followed closely by Craigslist and Freecycle. This little gem was waiting for us at the Goodwill a few weeks ago.

It's in good condition, but desperately needs some minor cleaning, a new coat of paint and possibly some different drawer pulls. We haven't entirely decided on the top surface, but the wood grain Formica is probably on the outs. The drawer slides are severely worn and the floor of the lower storage area is sagging significantly. Once it's all spiffed up, it'll go in the dining room as a sideboard. Stay tuned for project updates!

Lulu's Pie

Toward the end of July Lulu made a pie. The crust is hand made from her grandmother's recipe and we used all fresh fruit, including Michigan cherries procured on her recent trip to see her family and raspberries we had just picked in Bayfield. The pie was fantastic. If you look closely, you can see that I cut out a piece for myself and was ready to dig in before I was reminded to take a picture.

Monday, July 21, 2008

Flowering Miscellany

These are Outhouse Hollyhocks we grew from seed we ordered from SeedSavers Exchange. They are an heirloom variety that should produce a variety of bold colors with lots of blooms. According to the literature, Hollyhocks were often used to both identify and hide the outhouse. So, if you were at house you were unfamiliar with, instead of embarrassing yourself by asking where the outhouse was, you could just look for the Hollyhocks and figure it out. I'm just hoping I don't find some old timer rooting around next to the house after these things bloom.
Here are the day lilies in full bloom in front of the rain barrel on the East side of the house.

This is a mixed planting of flowers and greens with Amish snap peas growing up the fence. We've had a great crop of peas this year. On the right is our Clematis, which I was certain I had killed this past winter. It hasn't bloomed yet, but it has more vines than ever, so I'm optimistic about the flowers, whenever they show up.
Here is the front yard bed showing its first blooms. The light colored flowers are poppies, the yellow ones are Jolly Jester marigolds. The red tinged flowers are Bishop's children- not sure what they are going to look like.