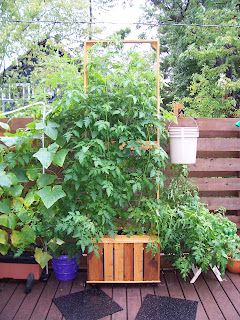
Here are some early Fall pictures of our tomatoes as they ripen in our various containers. This first shot shows all four varieties of container we used this season. On the left, our original, store bought EarthBox, which produced a decent crop of pickles, many of which are canned and in the pantry.
Next is a plain old pot, painted purple, with our sole surviving specimen of the Wisconsin 55 tomato. It's done quite well nestled in between the cukes and the Red Figs.
Next in line is the new GrowBox 2.0, which boasts a whopping 8 foot growing frame. The tips of the tallest plants are just reaching this amazing height as the days get shorter and the nights grow cooler. Hidden under all this foliage the Red Fig tomatoes are abundant.
And lastly, hanging to the right is one of six hand made upside down growing containers that are laden with green fruit. All six hangers have the same variety of tomato called Mucovite. I don't know much about this type, except that it is an heirloom breed and seems to like hanging upside down.
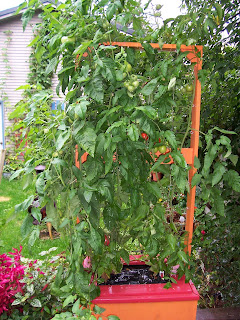
GrowBox 1.0 in all its glory. This has two varieties of plant going strong. On the left, one of our two Brandywine plants is loaded with large, interestingly shaped fruit. On the right is an Early Girl that produced a few fruit right away and has been slightly disappointing as the season wore on.
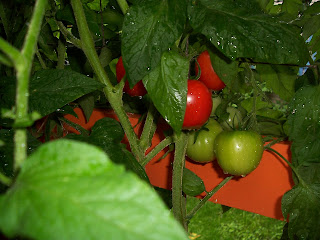
Here's a close up of the third, fourth and fifth ripe fruit the plant has produced. We've struggled with keeping our plants fed with the proper minerals and nutrients, so for the past several weeks, many of the fruit that were ripening on these plants were rotting from the blossom end. These were inedible and very frustrating. After consulting several organic gardening books, the best guess I can make is that the plants were low on calcium or manganese, which is a common problem for container tomatoes. After adding the powdered shells of several eggs (in a mortar and pestle), the plants seemed to stop producing rotting fruit. I added some specialized fertilizer that is made for container tomatoes, too, just for good measure and the result is pictured here.

Here's a good view of the next four hangers. Keep in mind that those are five gallon buckets hanging there and that the top board of the fence is a good 8 feet off the ground.
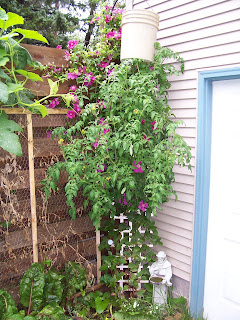
Here's the sixth and final hanging tomato of this season. It grew down into the clematis I was certain I'd killed over the winter. Notice the rogue squash or pumpkin that has grown over the fence and is threatening to take over the yard. The peas are done for this year. At the bottom there are several Swish Chard plants that are standing tall next to the Black Eyed Peas, which are really beans and I really don't know what to do with yet.
 First we wanted fresh, firm tomatoes. These ones were collected from our garden and from the Farmer's Market in Duluth. We have them ripening here in the south facing windows of our three season porch.
 Next, we prepare the tomatoes. After you quarter them, you roast them for about 40 minutes at 350 degrees. We drizzled some good olive oil over them and sprinkled some sea-salt and fresh cracked pepper, plus added some fresh, minced garlic before they went into the oven.
 Here we are using our Foley Food Mill, a device that separates most of the seeds and the skins from the flesh of the tomatoes. We purchased ours at a second hand store and I had to bang out a dent in before it would work properly, but once we got going it worked like a dream. I think I prefer this approach over the large conical sieve and wooden paddle model. This one is compact and worked very well.
 Here we added fresh chopped basil and rosemary to the velvety tomato goodness that our food mill created. We had both herbs growing in the back yard, so this batch of soup has some extremely fresh ingredients!
 We cooked the soup for a bit to mix the flavors, then fried up some cheese sandwiches, poured the delicious tomato nectar into our brain bowls and, voila! Aub found the brain ware on Etsy, an on-line artist's studio. These were hand crafted and shipped to us for just this kind of culinary excitement. We also have matching brain mugs, so we may need to experiment with some Bloody Mary mixes for those...


